Autonomous Navigation
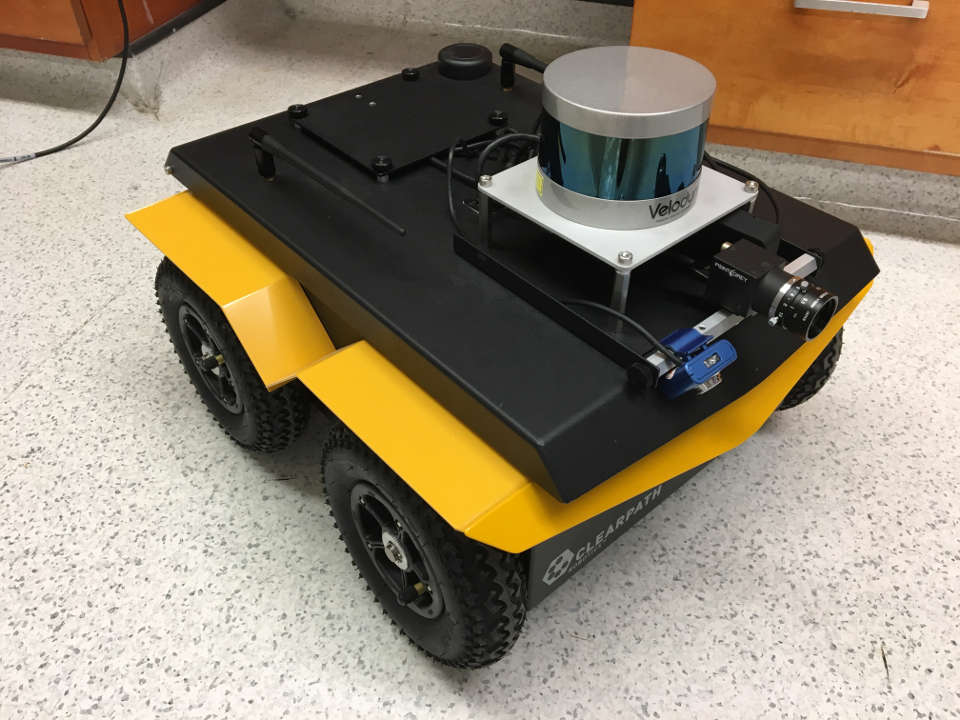
using Jackal UGV & Velodyne LIDAR
About the Project
I've always been interested in autonomous navigation, planning, and control, so I seized the opportunity when our lab received its new UGV (unmanned ground vehicle) from Clearpath Robotics. This also proved a great opportunity to experiment with pointcloud processing, something that has fascinated me since the beginning of its use in autonomous vehicles.
Hardware used:
Skills Involved
- ROS Navigation Stack, ROS plugins
- C++ & Python for real-time embedded control
- Motion planning & control algorithms
- Laser/LIDAR data handling
- Machine perception
- PCL (Point Cloud Library)
- Pointcloud filtering
- Gazebo, RViz
- Wireless network issue debugging
- Troubleshooting real robot hardware
Procedure
First Steps
The initial system setup for any project is often rushed or overlooked altogether. Since this was a brand new robot, a bit of up-front development was necessary to help ensure the project ran smoothly. A special wireless router was purchased for fast and uninterrupted communication, environment variables needed set on both the host and robot computer, and networking issues were debugged.
The laser also needed to be mounted. A simple bracket was manufactured at Northwestern's Segal Prototyping and Fabrication Lab. Care was taken to design the bracket such that the LIDAR unit was as low as possible (to better see objects low to the ground) while not occluding any of its visible range with the corners of the robot.
Most importantly, a simulated environment emulating the real robot was created for initial first-pass testing. Gazebo is the ROS simulation tool of choice, and, in conjunction with RViz, was used to verify properly-functioning sensor feedback and control of the robot. A virtual development environment is one of the most valuable up-front investments, as it facilitates rapid, rigorous, and safe validation of the algorithms implemented.
SLAM & Autonomous Navigation
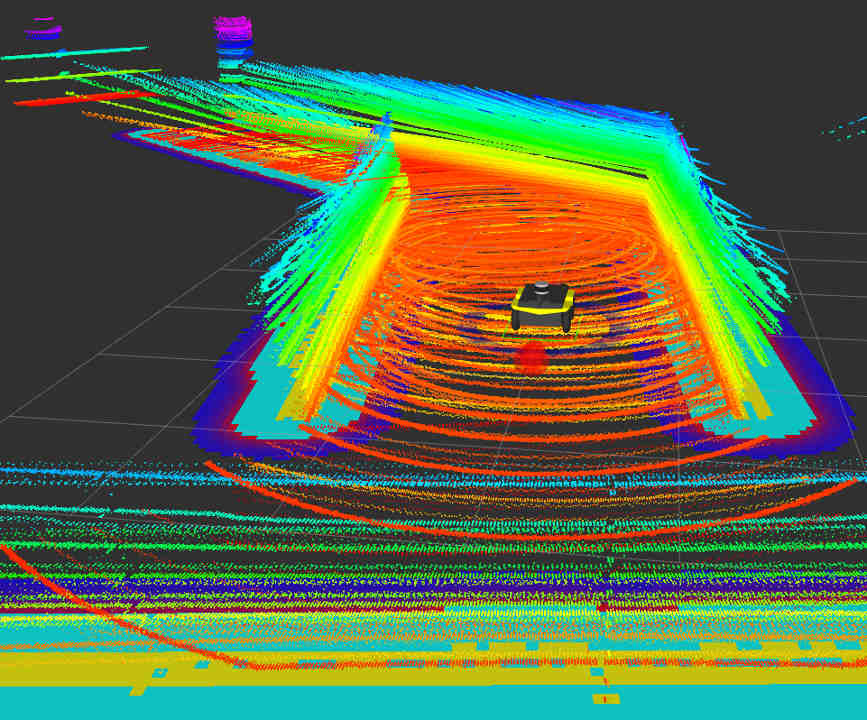 Once preliminary operations were working correctly, it was time to attempt a collision avoidance test run! But, as is typical with a robot's first steps, it didn't work very well. After digging into the issue, I discovered the root was a faulty costmap. Viewing the costmap revealed nearly 90% of the grid cells were believed to be lethal cost (essentially the entire floor was being treated as an obstacle). Diving a bit further, I found the laser scans were hitting the ground (as they should), but the primitive floor filter I had applied to the pointcloud did not account for tilting of the robot on uneven ground. Modifying the filter threshold to fix this would prevent Jackal from seeing real obstacles, so a more robust solution had to be created.
After coming up with the algorithm and adjusting to the PCL syntax in C++, the custom pointcloud filter was implemented. It worked nearly flawlessly, immediately eliminating erroneous costmap fill-up. The filter works by removing a few distinct subsets of the raw pointcloud as follows:
- Eliminate any points within a cylinder of radius of 0.2 m, centered on the robot (oriented vertically)
- Crop any points beyond 4 meters in the x and y directions
- Ignore points taller than the robot (0.4 m) or within 1 cm of the ground
- Remove all points below a conic surface angled 1.5° from the ground, centered on the robot and starting at ground height
The final bullet provides the majority of the benefit. Unlike in simulation, the real robot has manufacturing and assembly tolerances affecting the pose of the laser, and drives on ground that is not completely flat. The 1.5° conical filter eliminates any false detections from the floor due to tilt.
 After this, pure odometric collision avoidance was working reliably, and it was time to start building maps! SLAM has made huge strives in functionality and efficiency over the past few decades and is easily implemented using widely-available ROS packages. For this project, the popular gmapping package was used to construct global costmaps, and AMCL used to localize within these maps once built.
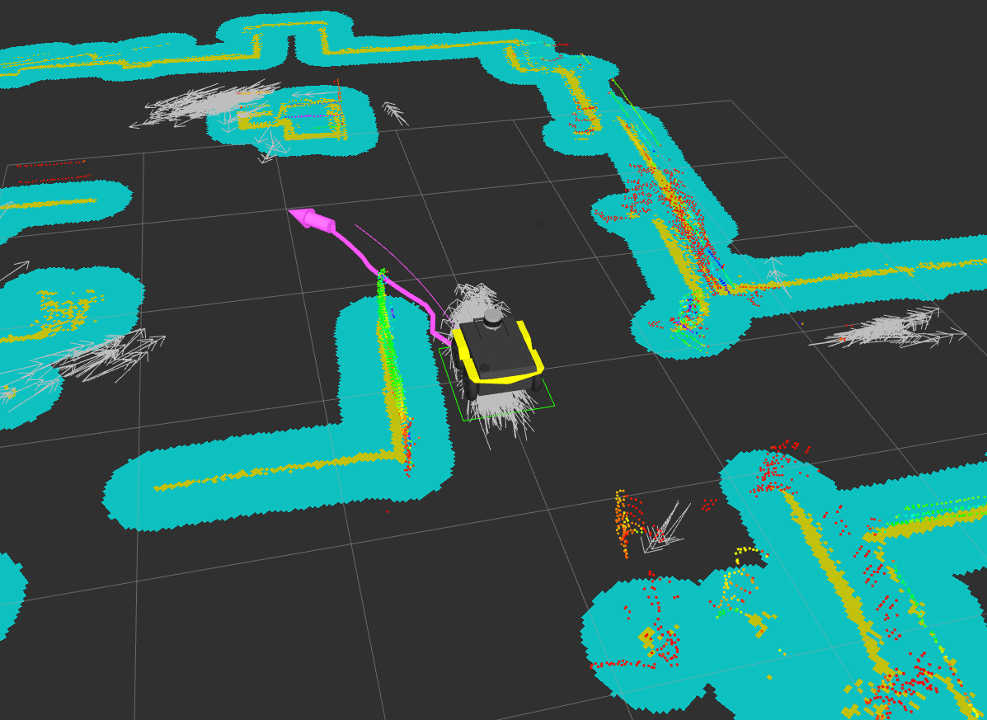
The accompanying picture shows Jackal autonomously navigating around the Robotics Lab and visually summarizes many important aspects of the project:
- Yellow represents known obstacles in the global costmap
- Cyan represents the inflation layer
- Light-gray arrows (mostly clustered beneath the robot) are individual particles of the particle filter
- The thick pink line is the path to the goal generated by the global planner
- The thin pink line represents the local path (what the robot's controller actually commands)
- Scattered red points are individual returns from the LIDAR.
Custom Controller & Beyond
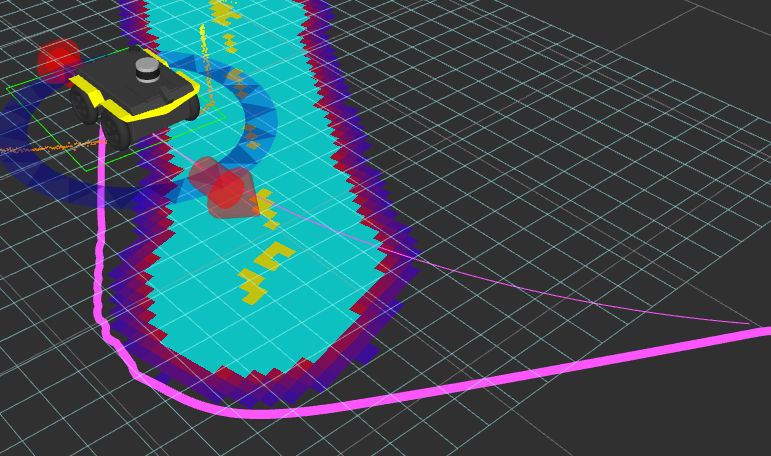 Navigation worked surprisingly well for a single-quarter project, but there were many aspects that could have been improved. A known issue with the current software is the tendency for the controller to cut corners constructed by the global planner. While most of the time this doesn't cause problems, occasionally it leads the robot to clip the very obstacle being circumnavigated. The adjacent picture shows an exaggerated example - the controller is about to drive Jackal into a wall during a simulation run.
The shortcomings of the default controller have been known for some time, and other options are readily available as plugins. However, I thought it would be worthwhile (and fun!) to implement a purpose-built controller, one much more ideal for this specific robot and configuration. While this idea came too late to fully incorporate into the final results of the project, it will continue to be worked on throughout intermissions and subsequent quarters at Northwestern.
Learn More
The software is freely available as a ROS package at https://github.com/njkaiser/nu_jackal_autonav. See the README for detailed information for installation and setup instructions for your robot (modifications may be necessary if using anything other than a Jackal and Velodyne VLP-16). Many open-source packages were used under the hood, so take a look at the package dependencies if you're interested only in a specific portion of the project.